Table of Contents
- Introduction
- Background
- A trivial project
- The nHello application
- Building and testing a .NET application with NAnt
- Using NAnt to deploy the database
- Tailoring NAnt deployments for different environments
- Replacing tokens with real values
- Loading the correct properties for the environment
- The compile build modified to deal with environments
- Customizing database connection strings for the environment
- Customizing database scripts to use environmental properties
- The database build modified to deal with environments
- Deploying a web application with NAnt
- Using NAnt to handle different application versions
- Putting it all together: a master build file
This article will show you how to use NAnt, an open-source command-line tool, to build, test and deploy an n-tier project consisting of database, service library (DLL) and web (ASP.NET) subprojects.
A zip file containing the sample code demonstrated in this article can be found here. Unzip it to a suitable location, where it will create a directory hierarchy with "nant-demo" as the root. This will give you the build files and source code, the article you are reading, as well as the Visual SourceSafe repository which is used in the demo.
The samples assume you are running Windows XP or 2003 Server (but 2000 versions might work too, if the rest of the prerequisites are met). First, you must have the .NET runtime and SDK installed. The samples have been tested with .NET 2.0 but will probably work with 1.1 as well.
You must have NAnt installed, including NAntContrib, and the directory holding nant.exe must be in your path. The documentation included with NAntContrib explains how to merge NAntContrib into your NAnt installation, which is the most seamless way to integrate the two.
You must have IIS and SQL Server running on your local machine, and you must have Administrator/sa privileges in both.
Copy the contents of the folder containing this document, including all subdirectories, into a folder on your hard drive (not named c:\nHello). In addition to the documentation and sample build files, this will give you a "vss" subdirectory containing a Visual SourceSafe repository used in the samples.
You must run the SourceSafe admin tool, open the repository in the "vss" subdirectory as the user "Admin", and add yourself as a user. Use your network name, minus the domain/computer prefix.
The samples will create a database in your local instance of SQL Server called "nHello" and a SQL login called "nHelloUser". The samples will also create a virtual directory in your local web server called nHello, which is mapped to a directory which will be created on your hard drive, c:\nHello.
NAnt is a console-based tool which allows arbitrary tasks to be grouped, arranged in sequences, and executed in a way that honors declared dependencies. Although primarily intended for compiling and deploying applications, it can be used for many other tasks.
In word: repeatability. NAnt doesn't dictate how you do anything or what procedures and standards you follow. But whatever you do, NAnt will allow you to do it more consistently and more quickly. It also allows you to integrate different activities into your build/deployment process, such as document generation, unit testing, logging and notification. Finally, it can reduce downtime in disaster recovery scenarios by giving you a way to rebuild, redeploy and reconfigure applications quickly.
NAnt evolved from a number of earlier tools, chiefly:
Make
From the world of Unix, this C-based program introduced the concept of multiple targets with dependency relationships which characterizes NAnt (and Ant). It has a number of variants (including Microsoft's nmake, a make utility for building C/C++ programs under Windows), is very widely used, and the de facto standard for Unix/Linux open source software. Unlike NAnt/Ant, however, it is based on shell scripts, which are platform specific, and so often requires a configuration step to prepare the commands appropriate to the current platform.
Ant
Ant was developed to provide make-like functionality for building and deploying Java applications. It takes advantage of Java to promote a more platform-indepenent approach, which consists of coding a lot of functionality into supporting Java libraries, and providing extension mechanisms. It also takes advantage of XML's support for hierarchical structures in its configuration files. Ant can be used for just about anything on any platform that supports Java.
Instead of Java, NAnt is written in C# on top of the the .NET runtime. It replicates much of Ant's functionality but without being an exact clone. There is much that is specific to .NET and Windows.
It's free
Open architecture - several extension mechanisms
On-line community of users and developers
Under active development
Small footprint - no registry or GAC usage, simple "xcopy" install
Declarative programming model - can reduce logic errors
The following is a very simple nant project demonstrating a basic project structure:
<project name="NantSample">
  <echo message="startup"/>
  <target name="targ1">
    <echo message="target 1"/>
  </target>
  <target name="targ2" depends="targ1">
    <echo message="target 2"/>
  </target>
</project>
<project name="NantSample">
  <echo message="startup"/>
echo is a NAnt-defined task. The task name is the element name. Because this task appears before any target definition, it is considered global and will always execute, even if no target is requested.
  <target name="targ1">
    <echo message="target 1"/>
  </target>
This project has two targets, each with one task.
  <target name="targ2" depends="targ1">
    <echo message="target 2"/>
  </target>
The depends attribute indicates which targets will be automatically executed before this one. Many targets can be chained together in this way, and each target takes care of its own dependencies.
By default NAnt looks for a file with a build extension in the current directory and executes it if there is only one. If there is more than one *.build file, or if you used a different extension, you must tell NAnt which build file to process
NAnt interprets command-line arguments beginning with a dash or forward slash as options. Here's how we specify the build file:
nant -f:simple.build
One or more targets are specified after the options:
nant -f:simple.build targ2
To find out all the command-line options:
nant -help
Although a toy application, nHello -- a variation on the ever-popular "hello, world" program -- features a fairly grown-up architecture to demonstrate how NAnt can help us build and deploy a modern n-tier application.
This application uses SQL Server, IIS, ASP.NET and C#. In this demo we assume we're running on an Windows XP or Server 2003 box, SQL Server and IIS are running locally, the .NET SDK (or Visual Studio .NET) is installed, and the current user has Administrator privileges.
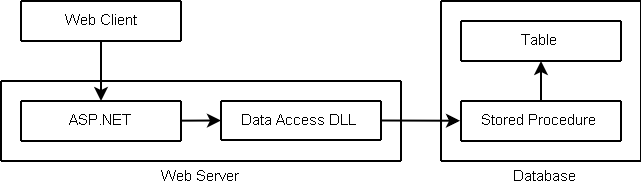
Below are listed all the objects used by nHello. Click on an object name to view its source, or click here to view all the source on one page.
| Database | Message | Table which stores message text. In our example we have just one row, with the value "Hello, world!". |
| p_GetMessage | Stored procedure which returns the message, following the practice of using stored procedures for data access instead of direct table access. Raises an error if there are no rows in Message. | |
| Data Access Layer | MessageServer | Class exposing a method to return a message. This is a wrapper for the actual database access logic so that client applications can deal with plain objects instead of databases. |
| Web Interface | WebMessage | Web page which gets the message and displays it. It uses MessageServer to get the message and writes it to the response stream as plain text. If MessageServer returns an error, WebMessage sets the HTTP status to indicate the error and displays the error message. |
| Test Harness | TestHarness | Console program to test data access layer. Like WebMessage, it uses MessageServer. If MessageServer returns an error, TestHarness displays an error message and signals the failure with an exit code which can be tested. |
The csc task allows C# source files to compiled. Like the command-line utility it is named after (found in the .NET SDK), it can be used to produce different types of output files (exe, dll), resolve references to classes in other assemblies, perform linking, etc. The next build file shows a project which builds the MessageServer library and the TestHarness console app. Note the "default" attribute of the project element -- this tells NAnt to execute the "compile" target if not target is specified.
<project name="nHello" default="compile">
  <target name="compile">
    <csc target="library" output="bin\MessageServer.dll">
      <sources>
        <include name="source\MessageServer.cs"/>
      </sources>
    </csc>
    <csc target="exe" output="bin\TestHarness.exe">
      <sources>
        <include name="source\TestHarness.cs"/>
      </sources>
      <references>
        <include name="bin\MessageServer.dll"/>
      </references>
    </csc>
  </target>
</project>The csc task does not automatically create destination directories if they don't exist. Therefore, let's add some global tasks to create the directories that we need in case they don't already exist:
<project name="nHello" default="compile">
  <mkdir dir="source"/>
  <mkdir dir="bin"/>
  ...
Our build file will work fine if the source code files exist in the "source" directory, but what if want to get the source code from our source code control system? Let's add a new target using the "vssget" task found in NAntContrib to fetch the needed source code:
  <target name="get">
    <vssget path="$/nHello/source" dbpath="vss\srcsafe.ini" localpath="source" version="1.0"/>
  </target>
Note that the attributes of vssget (explained in the NAntContrib documentation) indicate the project from which to fetch the files (path), the location of the repository configuration (dbpath), the directory into which the files will be copied (localpath), and the version of the code to fetch. The "version" attribute accepts a date, a number, or a label, and depending on which is supplied, the files are chosen based on date, file version number, or project label. We are selecting the version of the project labelled as "1.0". By default, vssget will get all the files in the project.
In the csc task, there were child elements (sources, references) which in turn contained lists of files. Tasks often contain child elements for lists of files and other data which can't be represented in the flat attribute list.
Let's add a "clean" target to unconditionally get rid of all files produced by the build. This is useful for testing and is a common feature of open source make files.
  <target name="clean">
    <delete>
      <fileset>
        <include name="bin\TestHarness.exe"/>
        <include name="bin\MessageServer.dll"/>
      </fileset>
    </delete>
  </target>
Note the "fileset" element inside the "delete" task. This is a generic type which is used in many tasks. In fact, the "sources" and "references" in the csc task are really instances of fileset.
Since we have a test harness to test the MessageServer.dll library, it would be useful to exercise it as part of the build. This will give us a chance to catch problems and fix them before we complete the deployment. To do this, we add a target using the "exec" task, which allows any command you can execute at a prompt to be executed as part of the build, with any needed arguments. If the command returns a non-zero return code, NAnt interprets that as a failure, and by default halts the rest of the build process.
  <target name="test" depends="get, compile">
    <exec program="bin\TestHarness.exe">
      <arg value="source"/>
    </exec>
  </target>
We include get and compile as dependencies, so that getting and compiling will happen automatically when this target is executed. Just running the compile target, on the other hand, doesn't automatically fetch the source code, so we can use that on checked out source files which we are editing.
The test harness takes one argument, the location of a configuration file (ConnectionString). Since that file is under source code control and was fetched into the "source" directory, we pass that as an argument.
<project name="nHello" default="compile">
  <mkdir dir="source"/>
  <mkdir dir="bin"/>
  <target name="compile">
    <csc target="library" output="bin\MessageServer.dll">
      <sources>
        <include name="source\MessageServer.cs"/>
      </sources>
    </csc>
    <csc target="exe" output="bin\TestHarness.exe">
      <sources>
        <include name="source\TestHarness.cs"/>
      </sources>
      <references>
        <include name="bin\MessageServer.dll"/>
      </references>
    </csc>
  </target>
  <target name="get">
    <vssget path="$/nHello/source" dbpath="vss\srcsafe.ini" localpath="source" version="1.0"/>
  </target>
  <target name="clean">
    <delete>
      <fileset>
        <include name="bin\TestHarness.exe"/>
        <include name="bin\MessageServer.dll"/>
      </fileset>
    </delete>
  </target>
  <target name="test" depends="get, compile">
    <exec program="bin\TestHarness.exe">
      <arg value="source"/>
    </exec>
  </target>
</project>The following transcript shows what happens when we run the build file specifying the "get" target, then the default target (compile), and finally the "test" target. I have edited out some of the output noise for clarity. Note that when the "test" target executes the "compile" target, nothing is compiled; that is because NAnt detects that the binaries produced previously are up to date. The test fails because we have not created the database yet; we will do that in the next section.
C:\nant-sample>nant -f:ex2.build get

    [mkdir] Creating directory 'C:\nant-sample\source'.
    [mkdir] Creating directory 'C:\nant-sample\bin'.

get:

   [vssget] Getting '$/nHello/source' to 'C:\nant-sample\source'...

BUILD SUCCEEDED

C:\nant-sample>nant -f:ex2.build

compile:

      [csc] Compiling 1 files to 'C:\nant-sample\bin\MessageServer.dll'.
      [csc] Compiling 1 files to 'C:\nant-sample\bin\TestHarness.exe'.

BUILD SUCCEEDED

C:\nant-sample>nant -nologo -f:ex2.build test

get:

   [vssget] Getting '$/nHello/source' to 'C:\nant-sample\source'...

compile:

test:

     [exec] Error connecting to database: Login failed for user 'nHelloUser'.

BUILD FAILED - 0 non-fatal error(s), 1 warning(s)Before we leave the compile build file, there is one last enhancement which will make our build file a little more maintainable. We have hard-coded references to directories scattered throughout the build file, leaving open the possibility of typos and inconsistencies. We can define properties for the names of the directories, and then reference the properties, and we can put those definitions in a separate file where they can be shared by other build files. If type in a property name incorrectly somewhere, NAnt will catch this as an error (referencing an uninitialized variable) when it parses the build file, before executing any target.
Here's what our global property file looks like. Note that besides "source" and "bin", I have defined a few directories we haven't used yet. It is really just another project file, but with no targets:
<project name="nHello">
  <property name="dir.src" value="source"/>
  <property name="dir.bin" value="bin"/>
  <property name="dir.sql" value="database"/>
  <property name="dir.web" value="asp"/>
  <property name="dir.web.bin" value="asp\bin"/>
  <property name="ini.vss" value="vss\srcsafe.ini"/>
</project>
Note that all the directories, since they don't begin with a backslash, are relative to the current directory, where the build file is located. Here is the modified compile build file, which now includes the global property file and references all directories using global variables. A leading dollar sign and curly braces are the syntax for referring to variables.
Here is the build file modified to read and use global properties:
<project name="nHello" default="compile">
  <include buildfile="global.prop"/>
  <mkdir dir="${dir.src}"/>
  <mkdir dir="${dir.bin}"/>
  <target name="compile">
    <csc target="library" output="${dir.bin}\MessageServer.dll">
      <sources>
        <include name="${dir.src}\MessageServer.cs"/>
      </sources>
    </csc>
    <csc target="exe" output="${dir.bin}\TestHarness.exe">
      <sources>
        <include name="${dir.src}\TestHarness.cs"/>
      </sources>
      <references>
        <include name="${dir.bin}\MessageServer.dll"/>
      </references>
    </csc>
  </target>
  <target name="get">
    <vssget path="$/nHello/source" dbpath="${ini.vss}" localpath="${dir.src}" version="1.0"/>
  </target>
  <target name="clean">
    <delete>
      <fileset>
        <include name="bin\TestHarness.exe"/>
        <include name="bin\MessageServer.dll"/>
      </fileset>
    </delete>
  </target>
  <target name="test" depends="get, compile">
    <exec program="bin\TestHarness.exe">
      <arg value="source"/>
    </exec>
  </target>
</project>In this section we will adapt NAnt to create the database required by the application, including the login used by the app, and a table and stored procedure. We'll also include a test target to make sure everything's working properly.
The database build file has three targets. The "get" and "test" targets serve the same purpose as before, namely to get the needed files from source code control, and to perform a minimal test. Instead of a "compile" target, however, we've defined a "deploy" target to execute the scripts in the database.
As with the compile build, we've included the global property file, and made sure any needed directories exist. In the "deploy" target, we first echo the connection string, then we use the "foreach" task to iterate over a list of files (see the NAnt documentation for details on how this works). This allows us to execute specific files in a specific order. The "do" part of "foreach" contains the commands to be executed on each file. In this case we use "echo" and the "get-file-name" function to echo the name of the file we are executing (without the directory part), then we use the "sql" task (found in NAntContrib) to execute the file in the database.
If all goes well, we should be able to execute the stored proc p_GetMessage and get back a message without raising an error. The "test" target does just that. Because the "sql" task needs a script to execute, the "test" target uses "echo" to construct a one-line script. It also constructs a different connection string (by defining a property) using the user name and password defined for the application.
<project name="nHello">
  <include buildfile="global.prop"/>
  <property name="sql.connstring" value="Provider=SQLOLEDB;Server=localhost;Integrated Security=SSPI"/>
  <mkdir dir="${dir.sql}"/>
  <target name="deploy">
    <echo message="* Connecting to ${sql.connstring}"/>
    <foreach item="File" property="sql.script">
      <in>
        <items>
          <include name="${dir.sql}\CreateDatabase.sql"/>
          <include name="${dir.sql}\CreateMessageTable.sql"/>
          <include name="${dir.sql}\p_GetMessage.sql"/>
        </items>
      </in>
      <do>
        <echo message="* Executing ${path::get-file-name(sql.script)}"/>
        <sql connstring="${sql.connstring}" delimiter="go" delimstyle="Line" batch="false" source="${sql.script}"/>
      </do>
    </foreach>
  </target>
  <target name="get">
    <vssget path="$/nHello/database" dbpath="${ini.vss}" localpath="${dir.sql}" version="1.0"/>
  </target>
  <target name="test">
    <property name="test.script" value="${dir.sql}/test.sql"/>
    <property name="test.connstring"
        value="Provider=SQLOLEDB;Server=localhost;Database=nHello;User ID=nHelloUser;Password=showme"/>
    <echo file="${test.script}" message="execute p_GetMessage;"/>
    <echo message="* Connecting to ${test.connstring}"/>
    <echo message="* Executing ${path::get-file-name(test.script)}"/>
    <sql connstring="${test.connstring}" delimiter=";" delimstyle="Normal" source="${test.script}"/>
  </target>
</project>The following transcript shows the result of executing the "deploy" and "test" targets ("get" is not shown but is assumed to have been run):
C:\nant-sample>nant -f:ex4.build deploy

deploy:

     [echo] * Connecting to Provider=SQLOLEDB;Server=localhost;Integrated Security=SSPI
     [echo] * Executing CreateDatabase.sql
      [sql] Changed database context to 'master'.
      [sql] The CREATE DATABASE process is allocating 0.49 MB on disk 'nHello_log'.
      [sql] The CREATE DATABASE process is allocating 0.63 MB on disk 'nHello'.
      [sql] Changed database context to 'nHello'.
      [sql] New login created.
      [sql] Granted database access to 'nHelloUser'.
     [echo] * Executing CreateMessageTable.sql
      [sql] Changed database context to 'nHello'.
      [sql] create table Message
      [sql] insert into Message
      [sql] 1 messages inserted
     [echo] * Executing p_GetMessage.sql
      [sql] Changed database context to 'nHello'.
      [sql] create procedure dbo.p_GetMessage
      [sql] grant execute on dbo.p_GetMessage to nHelloUser

BUILD SUCCEEDED

C:\nant-sample>nant -f:ex4.build test

test:

     [echo] * Connecting to Provider=SQLOLEDB;Server=localhost;Database=nHello;User ID=nHelloUser;Password=showme
     [echo] * Executing test.sql
      [sql]
      [sql] Hello, world!

BUILD SUCCEEDEDA notable weakness of our approach so far is that a lot of information which could be different in different environments -- login name and password, server name, database name -- is hard-coded, which is not very flexible. In this section we will improve both the database and application deployments to handle different environments gracefully.
A number of NAnt tasks -- for example, "copy" -- can include a chain of one or more filters which can check for tokens and replace them with text. By default, tokens are of the form @tokenname@. In version 1.1 of nHello, we change the content of the ConnectionString file in the source project from this:
Server=localhost;User ID=nHelloUser;Password=showme
to this:
Server=@SERVER@;Database=@DATABASE@;User ID=@USER@;Password=@PASSWORD@
The task we need to add to copy this file from one directory to another, and apply a filter to replace the tokens with their real values, will look like this:
<copy file="${dir.src}\ConnectionString" todir="${dir.bin}">
  <filterchain>
    <replacetokens>
      <token key="SERVER" value="${sql.host}"/>
      <token key="DATABASE" value="${sql.database}"/>
      <token key="USER" value="${sql.user}"/>
      <token key="PASSWORD" value="${sql.password}"/>
    </replacetokens>
  </filterchain>
</copy>
But first we must figure out how to store and retrieve different values for the tokens, depending on the environment. The solution is create another property file and include it, but to have a different version of the property file for each environment, and figure out the correct one to load at run-time.
Here is a property file with the correct values for an environment we'll call "local", because it uses the developer's local instance of SQL Server and IIS. We'll call it "env-local.prop". Besides the properties we know we need, we've defined some others we'll be using later:
<project name="nHello">
  <property name="sql.host" value="localhost"/>
  <property name="sql.database" value="nHello"/>
  <property name="sql.user" value="nHelloUser"/>
  <property name="sql.password" value="showme"/>
  <property name="web.host" value="localhost"/>
  <property name="web.port" value="80"/>
  <property name="web.name" value="nHello"/>
  <property name="web.deploy.path" value="c:\${web.name}"/>
  <property name="web.config.path" value="c:\${web.name}"/>
</project>How do we make sure this property file gets read? We can define a property right on the NAnt command line, and then reference it as if it had been defined in the build file. For example:
nant -D:env=local
defines a property named "env" with the value "local". Using this invormation we can read another build file by constructing the file name from the property:
<include buildfile="env-${env}.prop"/>If we initialize the "env" property with a different value on the command line, a different property file (defining the same properties but with different values) will be loaded.
Our final version of the compile build file knows how to create the ConnectionString file with the correct values for a given environment. We've made the customization of the ConnectionString file part of the "get" operation, copying the file with a modifying filter, as explained above. We've changed the argument to TestHarness.exe to use the modified ConnectionString file we copied into the bin directory. We've changed the "clean" target to delete the modified ConnectionString file along with the other generated files. The vssget task now uses a property for the version label, which we will also specify as a property on the command line. So, for example, the complete command to execute the "test" target will be:
nant -f:compile.build -D:env=local -D:ver=1.1 test
<project name="nHello" default="compile">
  <include buildfile="global.prop"/>
  <include buildfile="env-${env}.prop"/>
  <mkdir dir="${dir.src}"/>
  <mkdir dir="${dir.bin}"/>
  <target name="compile">
    <csc target="library" output="${dir.bin}\MessageServer.dll">
      <sources>
        <include name="${dir.src}\MessageServer.cs"/>
      </sources>
    </csc>
    <csc target="exe" output="${dir.bin}\TestHarness.exe">
      <sources>
        <include name="${dir.src}\TestHarness.cs"/>
      </sources>
      <references>
        <include name="${dir.bin}\MessageServer.dll"/>
      </references>
    </csc>
  </target>
  <target name="get">
    <vssget path="$/nHello/source" dbpath="${ini.vss}" localpath="${dir.src}" version="${ver}"/>
    <copy file="${dir.src}\ConnectionString" todir="${dir.bin}">
      <filterchain>
        <replacetokens>
          <token key="SERVER" value="${sql.host}"/>
          <token key="DATABASE" value="${sql.database}"/>
          <token key="USER" value="${sql.user}"/>
          <token key="PASSWORD" value="${sql.password}"/>
        </replacetokens>
      </filterchain>
    </copy>
  </target>
  <target name="clean">
    <delete>
      <fileset>
        <include name="bin\TestHarness.exe"/>
        <include name="bin\MessageServer.dll"/>
        <include name="bin\ConnectionString"/>
      </fileset>
    </delete>
  </target>
  <target name="test" depends="get, compile">
    <exec program="bin\TestHarness.exe">
      <arg value="bin"/>
    </exec>
  </target>
</project>We will now revisit the database build to deal with environmentally sensitive information there as well. Referring back to the properties we defined for the "local" environment, we can change the value of the sql.connstring property from this:
Provider=SQLOLEDB;Server=localhost;Integrated Security=SSPI
to this:
Provider=SQLOLEDB;Server=${sql.host};Integrated Security=SSPISimilarly, we can change the value of test.connstring from this:
Provider=SQLOLEDB;Server=localhost;Database=nHello;User ID=nHelloUser;Password=showme
to this:
Provider=SQLOLEDB;Server=${sql.host};Database=${sql.database};User ID=${sql.user};Password=${sql.password}To make the database scripts work for different environments, we can use a special feature of the "sql" task, which is that it can recognize property names in scripts and replace them with their values before executing them in the database. The effect is similar to that of the earlie copy/filter example, except that the sql task requires us to use NAnt property notation instead of the ampersand-delimited token format recognized by filters, and there is no copying involved.
Here is the database creation script, which also creates the user, with NAnt properties instead of hard-coded values:
use master
go

if not exists ( select 1 from sysdatabases where name = '${sql.database}' )
    create database ${sql.database}
go

use ${sql.database}
go

if not exists ( select 1 from sysusers where name = '${sql.user}' )
begin
    execute sp_addlogin '${sql.user}', '${sql.password}', '${sql.database}'
    execute sp_grantdbaccess ${sql.user}
end
goHere is the final version of the database build file, modified to handle different environments:
<project name="nHello">
  <include buildfile="global.prop"/>
  <include buildfile="env-${env}.prop"/>
  <property name="sql.connstring" value="Provider=SQLOLEDB;Server=${sql.host};Integrated Security=SSPI"/>
  <mkdir dir="${dir.sql}"/>
  <target name="deploy">
    <echo message="* Connecting to ${sql.connstring}"/>
    <foreach item="File" property="sql.script">
      <in>
        <items>
          <include name="${dir.sql}\CreateDatabase.sql"/>
          <include name="${dir.sql}\CreateMessageTable.sql"/>
          <include name="${dir.sql}\p_GetMessage.sql"/>
        </items>
      </in>
      <do>
        <echo message="* Executing ${path::get-file-name(sql.script)}"/>
        <sql connstring="${sql.connstring}" delimiter="go" delimstyle="Line" batch="false" source="${sql.script}"/>
      </do>
    </foreach>
  </target>
  <target name="get">
    <vssget path="$/nHello/database" dbpath="${ini.vss}" localpath="${dir.sql}" version="${ver}"/>
  </target>
  <target name="test">
    <property name="test.script" value="${dir.sql}/test.sql"/>
    <property name="test.connstring"
        value="Provider=SQLOLEDB;Server=${sql.host};Database=${sql.database};User ID=${sql.user};Password=${sql.password}"/>
    <echo file="${test.script}" message="execute p_GetMessage;"/>
    <echo message="* Connecting to ${test.connstring}"/>
    <echo message="* Executing ${path::get-file-name(test.script)}"/>
    <sql connstring="${test.connstring}" delimiter=";" delimstyle="Normal" source="${test.script}"/>
  </target>
</project>To complete our application, we need to deploy the web component, which serves as the interface for the end user.
The nHello web app consists of a single script (WebMessage.aspx), which uses MessagerServer.dll to fetch the message, then displays the message to the client. It needs to be deployed in a virtual directory in the web server (IIS).
All of the techniques used in this web build file should be familiar, as they have all been used in the .NET compile and database builds. The only completely new element is the "mkiisdir" task, another gift from NAntContrib, which can create or modify virtual directories in IIS.
<project name="nHello">
  <include buildfile="global.prop"/>
  <include buildfile="env-${env}.prop"/>
  <target name="deploy">
    <mkdir dir="${web.deploy.path}\bin"/>
    <mkiisdir dirpath="${web.config.path}" vdirname="${web.name}" appfriendlyname="${web.name}"
        aspallowsessionstate="false" iisserver="${web.host}:${web.port}"/>
    <vssget path="$/nHello/web" dbpath="${ini.vss}" localpath="${web.deploy.path}" version="${ver}"/>
    <copy file="${dir.bin}\MessageServer.dll" todir="${web.deploy.path}/bin"/>
    <copy file="${dir.bin}\ConnectionString" todir="${web.deploy.path}"/>
  </target>
</project>As one last touch, let's add a "test" target to exercise the web application and make sure it works. While there is a built-in "get" task in NAnt that can pull down a file from a URL, it is not very well adapted to our purpose. Instead, we will extend NAnt using the "exec" task, so that we can use curl, an open-source command-line tool which has many options for retrieving data via HTTP and other protocols (see http://curl.haxx.se/ for more information). The first argument instructs curl to display the HTTP headers; the second suppresses progress and performance information we're not interested in. Note that if the web server responds with an error it will be displayed in the HTTP header, but it will not cause curl itself to return a non-zero return code, so unfortunately NAnt will not recognize such an error. Perhaps someone in the NAnt community has already created the perfect add-in to do this -- otherwise, you can easily extend NAnt yourself to create your own add-in in C#!
  <target name="test">
    <exec program="curl.exe">
      <arg value="-D-"/>
      <arg value="--silent"/>
      <arg value="http://${web.host}:${web.port}/${web.name}/WebMessage.aspx"/>
    </exec>
  </target>
Here is what we see when we execute the deploy and build targets using the web build file. Note that we can specify more than one target on the command line; NAnt will execute them in sequence.
C:\nant-sample>nant -f:web.build -D:env=local -D:ver=1.1 deploy test

deploy:

    [mkdir] Creating directory 'c:\nHello\bin'.
 [mkiisdir] Creating/modifying virtual directory 'nHello' on 'localhost:80' (website: ).
   [vssget] Getting '$/nHello/web' to 'c:\nHello'...
     [copy] Copying 1 file to 'c:\nHello\bin'.
     [copy] Copying 1 file to 'c:\nHello'.

test:

     [exec] HTTP/1.1 200 OK
     [exec] Server: Microsoft-IIS/5.1
     [exec] Date: Thu, 28 Sep 2006 17:57:09 GMT
     [exec] X-Powered-By: ASP.NET
     [exec] X-AspNet-Version: 2.0.50727
     [exec] Cache-Control: private
     [exec] Content-Type: text/html; charset=utf-8
     [exec] Content-Length: 15
     [exec] Hello, world!

BUILD SUCCEEDEDAlthough not demonstrated here, based on the techniques used so far, it should be evident that setting a global property to a version label, which corresponds to a label in source code control, can allow builds and deployments to be customized for different application versions. For example, a generic database deployment may load a file list, retrieve all the files from source code control, and then execute them in the database. Different file lists can be created for different database versions, and the global version property can be used to select and load the correct file list. This ensures that the only objects touched in the database are those which must be created or modified, all others are left alone.
Also, while on the subject of file lists, these and other complex structures can be defined once, assigned an ID, then referenced in any context where they are needed. In the above example, this would allow you to define the file list once, then reference it in one place to get the scripts from source code control, and in another place to execute the scripts in the database.
NAnt features a "nant" task that can execute selected targets on other build files, allowing you to break up your projects into subprojects which can built, tested and deployed separately, or built together using a master build file as a driver. Here's our master build file:
<project name="nHello">
  <include buildfile="global.prop"/>
  <include buildfile="env-${env}.prop"/>
  <target name="deploy">
    <nant buildfile="sql.build" target="get deploy test"/>
    <nant buildfile="compile.build" target="get compile test"/>
    <nant buildfile="web.build" target="deploy test"/>
  </target>
</project>
Although there might not be a single person administering both your web servers and databases in your production environment, a master build can very useful for a developer testing the full deployment on his own machine, as well as in a disaster recovery situation where an administrator needs to rebuild an entire server.
To see the entire nHello n-tier application built, tested and deployed from scratch before your eyes, delete the nHello virtual directory in IIS, delete the c:\nHello directory, and execute the following SQL in your master database:
drop database nHello
go
sp_droplogin nHelloUser
go
Then execute
nant -f:master.build -D:env=local -D:ver=1.1 deploy
Try copying env-local.build to env-dev.build, edit the properties therein, and run another build to see how quickly you can deploy the application to your new "dev" environment. Check out some scripts or source code files from SourceSafe, make some changes, check them in and apply a new label to the nHello project, then rerun the deployment specifying the new version to see how quickly you can deploy an upgrade. Once you start working with NAnt, you'll wonder how you got along without it!